Friday, June 23, 2023

CLOUD DNS


CLOUD DNS is known as DOMAIN NAME SYSTEM, it acts as a distributed system that translates human-readable IP address like ( 173.0.2.1) that computers uses to communicate over the internet and it can handle large-scale traffic, offer global coverage and its provides fault tolerance. 

CLOUD DNS ROUTING DNS POLICIES

These are routing strategies which requests will be set to the backend domain through configurations. 

A. Default Routing Policy: Google cloud allow you to map the domain with multiple IP addresses to randomly do the routing. You can also map one single IP address. You can also map the IP of the load balancer to the domain which can be configured within routing policy. In most cases, for a simple application workload you may decide a default routing policy.

B. Weighted Routing Policy: This allows you to define different weight of applications from the backend that serve your workload. for example, Canary deployment approach. If you're in a critical environment and you do not want it to affect your customers and you do releases from time to time, and you need back-up, an active active or warm stand by will be the approach. 

C. Geo-location Routing Policy: This allows you to optimize latency, you can set up the load balancer  IP to a specific environment that has been define in the request. And this automatically re-route you based on your location. for example, Google use this to route to other geographical like google.uk, Amazon.ca etc. 

Cloud DNS technically has two features: 

A. Authoritative DNS look-up: You can configure your domain to point at a particular IP address vice versa. This is applicable for clients who already established a domain name at the level of cloud DNS. 

HOW DO YOU LOOK-UP AUTHORITATIVE  DNS

Forward DNS lookup: You set it up from a domain to IP address. This is leaving GCP to on-premises and this is as a result of inbound DNS forwarding.

Reverse DNS lookup: You're looking up from IP to domain. You're able to collect customers data through the URL the customers has accessed. for example: e-commerce site that you've accessed. 

B. Google Cloud DNS as a domain registra: In this case you are creating a new domain.

HOSTED ZONE : The record resides in hosted zone . The hosted zone is a bucket that you can house a single/ multiple configurations of your DNS solutions. By bucket it can be the platform you can use to map out your IP to actual domain.

TWO TYPES OF HOSTED ZONE.

A. Public and Private hosted zone. 

Public Zone: This manages users in the open internet.

Private Zone: When you're dealing with internal applications , Whatever happens within the VPC network its private.

ADVANTAGES OF CLOUD DNS

GCP provides 100% uptime availability SLA to customers, which means the cloud DNS services can never go down. 

 It provides end-to-end domain management system

It integrates with cloud IAM.

Cloud DNS, you can achieve admin activity login with cloud logging. For example, creating domains, creating DNS resolution.

Security like DNSSEC which you have to enable within your console to a more robust security. 

RECORDS

The actual configuration to resolve a domain to IP and the record resides within the hosted zone.


Referencing: Google documentation

Sunday, June 4, 2023

PROJECT- ORGANIZATION HIERARCHY


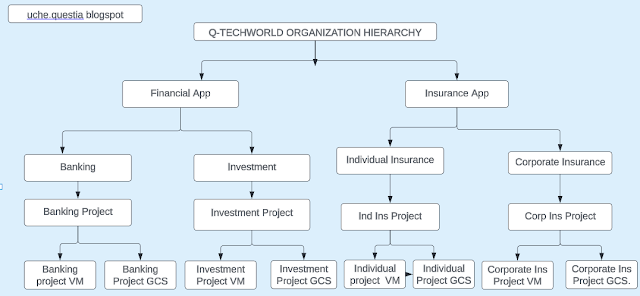
This is for learning purposes. In this project, you will create the different folders, projects and some resources such as VM instances and buckets and upload some pictures in each bucket created for the Q-TechWorld. 

https://cloud.google.com/resource-manager/docs/cloud-platform-resource-hierarchy


STEP 1: 

Login to your domain account and select your organization owner project under IAM and permission, edit permission for the organization owner and grant cloud Asset owner, organization Administrator, security centre Admin roles by editing it. 


STEP 2:

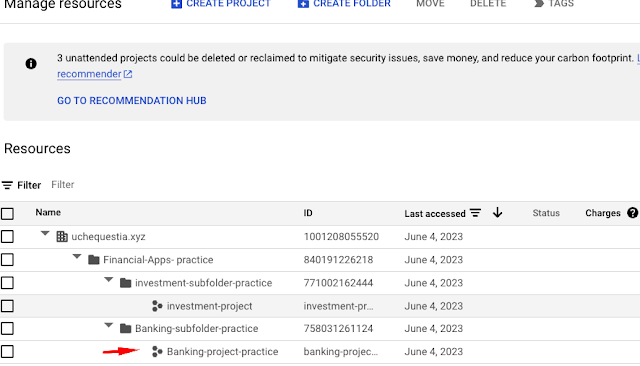
Click on manage resources under IAM and click on create folder to create folders and projects per requirements. 


STEP 3:

Create a Financial App and Insurance App Folders

Create Banking, Investment,Individual insurance and corporate insurance subfolders. 


You create the subfolders and browse your location within the folders. 


STEP 4:

Select the newly created Banking project and Investment project from the project tab and then create resources such as VM instance, Banking project VM by searching for compute engine. 


You should this structure within your manage resources.


STEP 5:

Creating a VM instance Banking-VM in us-central 1b- zone with the basic information and centos 7 image. 


You can SSH into your browser and grant access. 


STEP 6:

Create the second resource for the banking project by searching for cloud storage.

 Create banking project-gcs basic bucket and upload a picture. 


STEP 7:

Select the newly created Investment project from the project tab and then create resources such as VM instance( investment project vm) by searching for compute engine. 


Create a VM instance Investment-vm in us-central 1a- zone with the basic information and Debian- 11 image. 


Create the second resource for the investment project by searching for cloud storage.
  Create investment project-gcs basic bucket and upload a picture. 


STEP 8:

Select the newly created Corporate project from the project from the project tab and then create resources such as VM instance  (Corporate- project-VM) by searching for compute engine. 


Create a VM instance corporate- VM in us-central 1-F zone with the basic information and Ubuntu-18.04 image. 


Create the second resource for the corporate project by searching for cloud storage.
  Create corporate-project-gcs basic buckets and upload a picture. 


STEP 9:

Select the newly created individual ins project from the project tab and then create resource such as VM instance (individual-project-vm)by searching for compute engine. 


Create a VM instance individual-ins-vm in us-central 1c zone with the basic information and fedora cloud image. 


Create the second resource for the corporate project by searching for cloud storage.

  Create individual-project-gcs basic bucket and upload a picture.


You've been able to run through organizational hierarchy project. Happy Learning 😊!!!


Referencing : Google Documentation


Friday, June 2, 2023

HANDS-ON PERSISTENT DISK, LOCAL DISK, BOOT DISK & CONFIGURATION FILES SET-UP


Today, you will attach a persistent disk to an existing VM or attaching  a new disk without stoping the VM. 

STEP 1: 

Create a folder in your local "Google-Cloud-Platform"

STEP 2:

Within step 1 folder, create a folder "Compute"

STEP 3:

Within step 2 folder, Create two folders "Compute-Engine and APP-Engine".


STEP 4:

Create a file "jjtechflix-app-deploy.sh"within compute-engine. Any script that has .sh is a shell script and can only run in a linux machine. 

STEP 5:

Paste script within the file and technically you should have 11 lines of codes and save. 

#! /bin/bash
sudo apt update -y
sudo apt -y install apache2
sudo systemctl start apache2
sudo systemctl enable apache2
sudo apt install wget -y
sudo wget https://github.com/awanmbandi/google-cloud-projects/raw/jjtech-flix-app/jjtech-streaming-application-v1.zip
sudo apt install unzip -y
sudo unzip jjtech-streaming-application-v1.zip
sudo rm -f /var/www/html/index.html
sudo cp -rf jjtech-streaming-application-v1/* /var/www/html/

STEP 6:

Create a VM, allow HTTP traffic, expand advance option and expand management, you'll see automation start script and ensure that you pass the data at the level and create. 


#! /bin/bash - Allow you to run operations inside linux. 


STEP 7:

Copy your external IP address and run on your browser, click on the disk. You should see the application you deployed. This is not a secured site. 


STEP 8:

You're creating a second disk to attach to an existing VM. Click on disk and it tells you exactly what VM is associated with the disk. You create a disk. The second disk will not be refer to as a boot disk because it has no image, OS. 


STEP 9:

Go back to VM , click the name you created and click on edit. Your interest is within edit. You can start changing things within the panels, its either you're changing or adding. 


STEP 10:

Search for storage, you'll see the boot disk which you configured. Select "keep disk". This means that, even though you delete the VM, the disk will not be deleted. Click on add new disk and save. 


STEP 11: 
You created an additional disk that has no image. You will create a custom image from this disk and attached an instance. 


STEP 12:
You're preparing for disaster recovery strategies on the application. The application is running within the boot disk that is powering the VM. We need to focus on the actual boot disk. In order to achieve this, you create a custom image from the existing VM and you'll still able to recovery and access it.  

Click on the instance name and create machine image.

 You select the option "regional" to save cost. The multi will incur cost. And create. 

By default when you create a custom image it will automatically capture the additional disk that you initially create including the boot disk. Within the created custom image you can create an instance


STEP 13:
Create instance from the machine image.

change the name of your "vm" and save. 


STEP 14:
Snap shot : You will take back up of your persistent disk. 

Go to disk and  click your VM you created and create snapshot and create. 


You can also filter based on labels. 

STEP 15:
You're trying to automate snapshot for an application back up. To achieve this, you click on snapshot panel and "create snap shot schedule". Your persistent disk( VM) should be in the same region where  the snapshot is taken.  


You take snap shot when the application traffic is at its lowest. You have to identify your peak period of request from users. for example, 1am -2am.  Once this snap shot is created, by default all the snap shot  in that particular region will be taken.


STEP 15:
You've successfully deployed a persistent disk, attached an additional disk and provisioned an image which you then created a custom image. We configured with a snapshot for back-up. 

Happy Learning!!😊

Referencing: Mbandi AAK 

https://github.com/awanmbandi

                    Google documentation. 


CONFIGURING A PHISHING CAMPAIGN IN MICROSOFT DEFENDER.

Configuring a phishing campaign in Microsoft Defender (specifically Microsoft Defender for Office 365) involves creating a simulated attack ...